FREE
circuits!
How to build LED Tester Circuit Diagram
September 27, 2010 - category: Component testerDescription
You have to admit that these tiny electronic lamps are handy, and they last almost forever. Around 40 years after Nick Holanyak developed the first LED, they have become just about indispensable. Any self-respecting electronics hobbyist always has a few in his junk box. But before you use LEDs, it’s a good idea to check them out. With a LED tester, you can even do it in the dark!
LEDs are available nowadays in all shapes and colors. There are types with clear, colorless packages, while others have colored plastic packages. Many modern types of LEDs need less current than older types. Some of them provide quite a puddle of light if you give them a decent amount of current. When you’re working with used LEDs from the junk box, there’s a good chance that you can’t tell which lead is which any more.
(If the leads haven’t been trimmed, the short lead is always the cathode lead and the long lead is the anode lead.) If you use several LEDs in a display where they all have the same current you naturally want all the LEDs to have the same brightness. But that’s not always the case, even with LEDs of the same type. To save yourself unnecessary soldering work, it’s a good idea to check the LEDs out first. That’s the job of the LED tester described here.
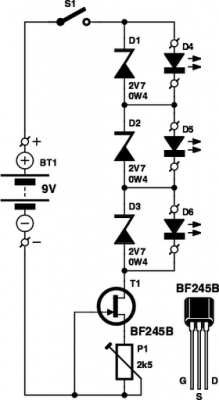
Circuit diagram:
This circuit can be used to test up to three LEDs at once, connected in series. You can easily increase that number by using a higher supply voltage. If you do so, you should allow 2.7 V for each additional LED. The Zener diodes are included in the circuit so it can also be used to test one or two LEDs. Another benefit of the Zeners is that even if one or more of the LEDs are defective or connected with reverse polarity, the remaining ones will light up normally. That makes it easy to spot suspect LEDs.
If you extend the tester to handle more LEDs, you must add another Zener diode for each LED position. The test current that ? ows through the LEDs is held reasonably constant by FET T1, independent of the number of LEDs being tested. The FET is used as a constant-current source to keep the circuit as simple as possible. The drawback of this approach is that the tolerance range of FET characteristics is especially large. The type used here even has three versions: A, B and C.
We used the B version here so the current through the LEDs can be adjusted using potentiometer P1 over the range of 1–7 mA. If you need more current, you can use a BF254C instead, but then you will also need a higher supply voltage. For example, you can connect two 9-V batteries in series or power the circuit from a mains adapter. However, some LEDs have a maximum rated current of only 5 mA. You should thus always start testing at the lowest current by setting P1 to maximum resistance.
You can easily see from the brightness whether you need more current. If an LED does not light up, it may be defective or connected the wrong way round. Reduce the current to the minimum level before reversing or replacing any LEDs. If you label the polarity of the terminals on the LED tester, you can easily mark the cathode and anode leads of the tested LEDs. To make it easy to swap the LEDs, you can use an IC socket as a test socket. The selected Zener diodes were chosen to make the tester suitable for red, yellow and green LEDs.
Red LEDs have a forward voltage of 1.6 V to 1.8 V. The value for yellow LEDs is around 1.9 V, and with green LEDs the forward voltage can be as high as 2 V. If you also want to test modern blue or white LEDs, you will have to replace the Zener diodes with types having a voltage of 4.7 V or 5.1 V. The supply voltage will also have to be increased accordingly – for example, by connecting two 9-V batteries in series.
author: Elektor Electronics 12-2006
circuit from http://www.extremecircuits.net/2010/04/led-tester-circuit-diagram.html


 This category