FREE
circuits!
How to build Bedside Lamp Timer
December 12, 2010 - category: Timer30 minutes operation
Blinking LED signals 6 last minutes before turn-off
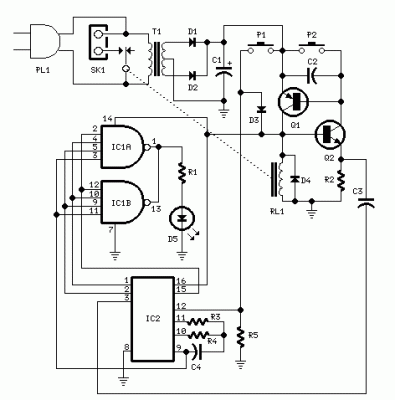
Circuit diagram
Parts:
- R1 1K 1/4W Resistor
- R2 4K7 1/4W Resistor
- R3 10M 1/4W Resistor
- R4 1M 1/4W Resistor
- R5 10K 1/4W Resistor
- C1 470µF 25V Electrolytic Capacitor
- C2-C4 100nF 63V Polyester Capacitors
- D1-D4 1N4002 100V 1A Diodes
- D5 5mm. Red LED
- IC1 4012 Dual 4 input NAND gate IC
- IC2 4060 14 stage ripple counter and oscillator IC
- Q1 BC328 25V 800mA PNP Transistor
- Q2 BC238 25V 100mA NPN Transistor
- P1,P2 SPST Pushbuttons
- T1 220V Primary, 9 + 9V Secondary 1VA Mains transformer
- RL1 10.5V 470 Ohm Relay with SPDT 2A 220V switch
- PL1 Male Mains plug
- SK1 Female Mains socket
Device purpose:
The purpose of this circuit is that of power a lamp or other apparatus for a given time (30 minutes in this case), and then to turn it off. It's useful when reading at bed by night, turning off the bedside lamp automatically in case the reader falls asleep... After turn-on by P1 pushbutton, an LED lights for c25 minutes, but 6 minutes before the turn-off, start blinking for two minutes, then stop blinking for other two minutes and finally blinks for other two minutes, thus signaling that the on-time is ending. If the user want to prolong the reading, can earn another half-hour of light by pushing on P1. Turning-off the lamp at user's ease is obtained pushing on P2.
Circuit operation:
Q1 and Q2 forms an ALL-ON ALL-OFF circuit that in the off state draw no significant current. P1 starts the circuit, the relay is turned on and the two ICs are powered. The lamp is powered by the relay switch, and IC2 is reset with a positive voltage at pin 12. IC2 start oscillating at a frequency settled by R4 and C4. With the values shown pin 3 goes high after c30 minutes, turning off the circuit via C3. During the c6 minutes preceding turn-off, the LED does a blinking action by connections of IC1 to pins 1,2 & 15 of IC2. Blinking frequency is provided by IC2 oscillator at pin 9. The two gates of IC1 are in parallel to source an higher current. If needed, a piezo sounder can be connected at pins 1 & 14 of IC1. Changing IC2 brand name, varies the oscillation frequency. In particular Motorola's ICs run faster. Obviously, time can be varied changing C4 and R4 values.
This circuit was awarded with publication in ELECTRONICS WORLD "Circuit Ideas", October 1999 issue, page 819.
author: RED Free Circuit Designs
circuit from http://www.redcircuits.com/


 This category