FREE
circuits!
How to build Mains Remote-Alert
December 11, 2010 - category: MiscellaneousWarning! These units are connected to 220Vac mains, then some parts in the circuit boards are subjected to lethal potential!. Avoid touching the circuits when plugged and enclose them in plastic boxes.
Remotely-operates a Beeper and/or a LED via mains supply line
Simple circuitry, easy to build unit
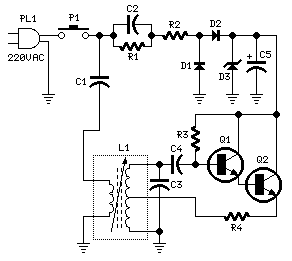
Transmitter circuit diagram:
Transmitter parts:
- R1 220K 1/4W Resistor
- R2 470R 1/2W Resistor
- R3 100K 1/4W Resistor
- R4 1K 1/4W Resistor
- C1 10nF 400V Ceramic or Polyester Capacitor
- C2 330nF 400V Polyester Capacitor
- C3 1n5 63V Ceramic Capacitor (See Notes)
- C4 10nF 63V Ceramic or Polyester Capacitor
- C5 100µF 25V Electrolytic Capacitor
- D1,D2 1N4007 1000V 1A Diodes
- D3 BZX79C30 30V 500mW Zener Diode
- Q1,Q2 BC546 65V 100mA NPN Transistors
- L1 IF Transformer for AM receivers, 445-470KHz
- P1 SPST Mains suited Pushbutton
- PL1 Male Mains plug & cable
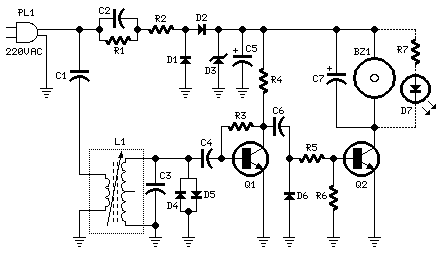
Receiver circuit diagram:
Receiver parts:
- R1 220K 1/4W Resistor
- R2 470R 1/2W Resistor
- R3 150K 1/4W Resistor
- R4 2K2 1/4W Resistor
- R5 100K 1/4W Resistor
- R6 47K 1/4W Resistor
- R7 2K2 1/4W Resistor (Optional)
- C1 100nF 400V Polyester Capacitor
- C2 330nF 400V Polyester Capacitor
- C3 1n5 63V Ceramic Capacitor (See Notes)
- C4,C6 330pF 63V Ceramic Capacitors
- C5,C7 100µF 25V Electrolytic Capacitors
- D1,D2 1N4007 1000V 1A Diodes
- D3 BZX79C12 12V 500mW Zener Diode
- D4,D5,D6 1N4148 75V 150mA Diodes
- D7 5mm. Red LED (Optional)
- Q1,Q2 BC547 45V 100mA NPN Transistors
- L1 IF Transformer for AM receivers, 445-470KHz
- BZ1 Piezo sounder (incorporating 3KHz oscillator)
- PL1 Male Mains plug & cable
Device purpose:
Pressing the pushbutton of the transmitter, a sound and/or light alert is activated in the receiver. The system uses no wiring or radio frequencies: the transmitted signal is conveyed into the mains supply line. It can be used at home, in any room from attic to cellar, simply plugging transmitter and receiver in the wall mains sockets. Transmission range can be very good, provided both units are connected to the mains supply within the control of the same light-meter.
Transmitter circuit operation:
Q1 and Q2 are wired as a Darlington pair to obtain the highest possible output from a Hartley type oscillator running at about 135KHz frequency. The 220Vac mains is reduced to 30Vdc without the use of a transformer by means of C1 reactance, a two diode rectifier cell D1 & D2 and Zener diode D3. The oscillator output is taken from L1 secondary winding and injected into the mains wiring by means of C1.
Receiver circuit operation:
The 135KHz sinewave generated by the transmitter is picked-up from mains wiring by C1 and selected by the tuned circuit L1-C3. Q1 greatly amplifies the incoming sinewave and converts it in a 12V-peak squarewave. D4 & D5 limit the input voltage at Q1 base to less than 1V-peak to avoid damaging of the transistor due to the high voltage transients frequently occurring on the mains line. D6 eliminates any negative component of the signal and Q2 drives the load. C7 is necessary to smooth the signal residues appearing across the load. The 12Vdc supply for this unit is obtained as described above for the transmitter circuit.
Notes:
- Transmitter and receiver coils L1s must be tuned regulating their ferrite cores to obtain maximum output at C3 leads, both in transmitter and receiver.
- This setup is better done using an oscilloscope and placing the two units as far as possible to each other.
- The tuning of the coils at 135KHz frequency should be obtained with the ferrite core almost totally inserted in its slot, if 455KHz IF transformers are used for both L1s.
- Using IF transformers different from those specified, a change in both C3s value can be needed. The value of these capacitors may be varied from 1 to 3.3nF but must be the same in transmitter and receiver.
- The load can be a beeper, a LED or both. Omitting the beeper and choosing the LED as the only load, its limiting resistor R7 should be reduced in value to about 1K, to increase device brightness. In this case, a 10mm. diameter LED type or greater, can also be useful
author: RED Free Circuit Designs
circuit from http://www.redcircuits.com/


 This category