873
FREE
circuits!
FREE
circuits!
How to build Two-wire Lamp Flasher
October 12, 2010 - category: Light flasherIdeal to operate 3 to 24V DC existing on-circuit lamps
LED operation is also possible
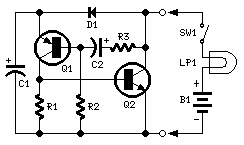
Circuit diagram
Parts:
- R1 6K8 1/4W Resistor
- R2 270K 1/4W Resistor
- R3 22K 1/4W Resistor
- C1 220µF 25V Electrolytic Capacitor
- C2 10µF 25V Electrolytic Capacitor
- D1 1N4002 100V 1A Diode
- Q1 BC557 45V 100mA PNP Transistor
- Q2 BD139 80V 1.5A NPN Transistor
- LP1 Existing filament Lamp: any type in the range 3-24V 10W max.
- SW1 Existing On-Off switch
- B1 Existing V DC source: any type in the range 3-24V
- suited to the lamp adopted
Device purpose:
This circuit has been designed to provide that continuous light lamps already wired into a circuit, become flashing. Simply insert the circuit between existing lamp and negative supply. Especially suited for car or panel pilot lights, this device can drive lamps up to 10W.
Notes:
- Break lamp(s) to negative supply connection(s), then insert the circuit between existing lamp(s) connection(s) and negative supply (respecting polarities!).
- C1 value can be varied from 100 to 1000µF or higher, in order to change flashing frequency.
- Although rather oversized, this circuit can also drive any LED, providing a suitable resistor is fitted in series with the light emitting device.
- The resistor should be in the range 47R to 2K2, depending on supply voltag
author: RED Free Circuit Designs
circuit from http://www.redcircuits.com/


 This category