873
FREE
circuits!
FREE
circuits!
How to build Electronic Stethoscope
November 16, 2010 - category: Audio preamplifierDescription
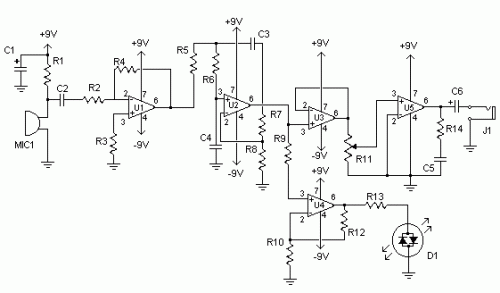
Stethoscopes are not only useful for doctors, but home mechanics, exterminators, spying and any number of other uses. Standard stethoscopes provide no amplification which limits their use. This circuit uses op-amps to greatly amplify a standard stethoscope, and includes a low pass filter to remove background noise.
Circuit diagram
Parts:
- R1 10K 1/4W Resistor
- R2, R3, R9 2.2K 1/4W Resistor
- R4 47K 1/4W Resistor
- R5, R6, R7 33K 1/4W Resistor
- R8 56K 1/4W Resistor
- R10 4.7K 1/4W Resistor
- R11 2.5K Pot
- R12 330K 1/4W Resistor
- R13 1K 1/4W Resistor
- R14 3.9 Ohm 1/4W Resistor
- C1 470uF Electrolytic Capacitor
- C2, C3, C4 0.047uF Capacitor
- C5 0.1uF Capacitor
- C6 1000uF Electrolytic Capacitor
- D1 Bi-Colour LED
- U1, U2, U3, U4, U5 741 Op-Amp
- MIC1 Electret Mic
- J1 1/4" Phone Jack
- MISC Board, Wire, Sockets for ICs, Knob for pot, Stethoscope, Rubber tube
Notes:
- MIC1 is an assembly made out of a stethoscope head and electret mic. Cut the head off the stethoscope and use a small piece of rubber tube to join the nipple on the head to the mic.
- Be careful with the volume, as excess noise level may damage your ears.
- The + and - 9V may be supplied by two 9V batteries wired in series and tapped at the junction.
- R11 is the volume control.
circuit from http://www.aaroncake.net/


 This category