FREE
circuits!
How to build A Cmos Based Single Zone Alarm
August 4, 2010 - category: AlarmDescription
This circuit features automatic Exit and Entry delays - timed bell cut-off - and system reset. It has provision for normally-open and normally-closed switches - and will suit all of the usual input devices (Pressure Mats, Magnetic Reed contacts, Foil Tape, PIRs and Inertia-Sensors).
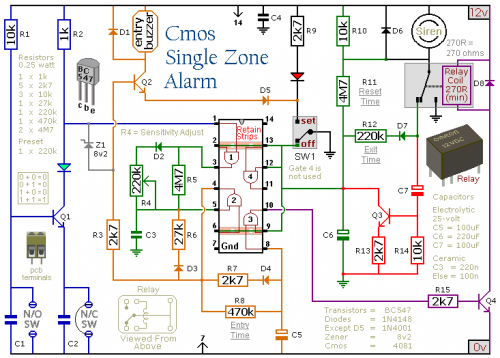
Schematic Diagram
If the green LED is not lighting - check for an open window or door etc. Once you're satisfied that the building is secure - and the green LED is lighting - move SW1 to the "set" position. At this point - the red LED will light - and the Exit Delay will begin. The length of the Exit Delay is set by the value of R12.
With a 220k resistor - you have about 30 to 40 seconds to leave the building. As you do so - the Buzzer will sound. It should stop sounding when you close the door behind you. This indicates that the trigger circuit has been successfully restored within the time allowed.
When you return to the building and open the door - the Buzzer will sound - and the Entry Delay will begin. The length of the Entry Delay is set by the value of R8. With a 470k resistor- you'll have about 30 to 40 seconds to move SW1 to the "off" position. If you fail to do so - the Siren will sound.
The length of time the Siren sounds is set by R11. With a 4M7 resistor it will sound for about 15 to 20 minutes. Then the relay will drop out - and the alarm will attempt to reset itself. It does this by using Q3 to switch itself "off" briefly.
If the trigger circuit has been restored - the alarm will reset. If not - the attempt will fail - and the alarm will reactivate. It will go on trying to reset itself every 15 to 20 minutes - until either the trigger circuit is restored - or the alarm is switched off.
All the usual triggering devices may be connected to the input terminals. These include Inertia-Sensors. The sensitivity of the Sensors is adjusted by R4. Set to minimum value - a light tap will activate the alarm. Set to maximum value - a heavy blow is required.
If you are not using Inertia Sensors - replace R4 with a 220k fixed resistor. If you are not using normally-open switches - you can leave out R1, C1 & Q1 - but you must fit an extra link between the Green Led and C2.
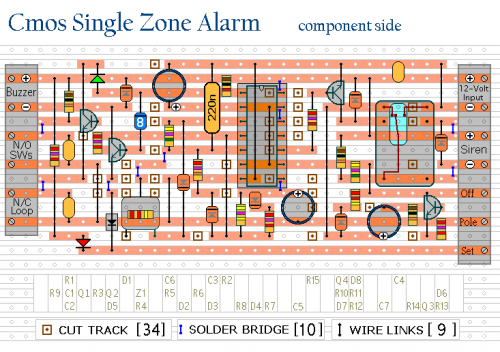
Veroboard Layout
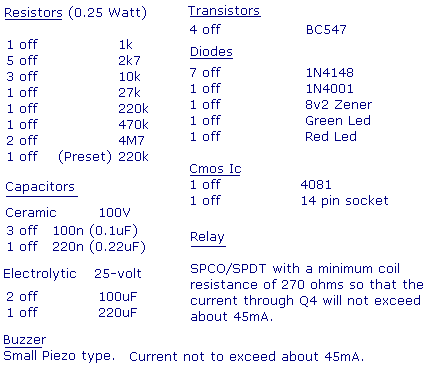
Parts list
circuit from http://www.zen22142.zen.co.uk/ronj/csza.html


 This category